
NUnit is a test framework for all Microsoft .Net language. NUnit is derived from JUnit, a unit test framework for Java. It is written in C# and helps you to execute unit tests for code written in .net. At the time of writing this article, the most recent version of NUnit was 2.6.2. NUnit supports many features but in this article, I explain only those features which are actually required by black box testers. I intend to write another article on advanced NUnit where I will cover the features in depth.
GETTING STARTED:
Let’s write a simple banking program.
[sourcecode language=”csharp”]
namespace Banking
{
public class Banking
{
private double balance;
public Banking()
{
balance = 0;
}
public void DepositMoney(double depositAmount)
{
balance += depositAmount;
}
public double WithdrawMoney(double withdrowAmount)
{
balance -= withdrowAmount;
return balance;
}
}
}
[/sourcecode]
If I ask you to write unit test for this program, you may write like this:
[sourcecode language=”csharp”]
namespace Banking
{
public class BankingTest
{
public void TestBankingTransfers()
{
Banking banking = new Banking();
banking.DepositMoney(300);
banking.DepositMoney(100);
double remainingBal = banking.WithdrawMoney(200);
if (remainingBal == 200)
{
Console.WriteLine(“Test working”);
}
}
}
[/sourcecode]
But the biggest problem with this approach lies in identifying and running the tests in a simple way. We can write a unit test case like the one mentioned above but what if we want to execute this test for another set of input? We cannot write the same test in a loop or make our test more complex. In this case, we need to use a test framework which was designed to test the code at the unit level with less hassle.
This is where NUnit comes into picture. The same code will now look like this:
[sourcecode language=”csharp”]
using NUnit.Framework;
namespace Banking
{
[TestFixture]
public class BankingTest
{
[Test]
public void TestBankingTransfers()
{
Banking banking = new Banking();
banking.DepositMoney(300);
banking.DepositMoney(100);
double remainingBal = banking.WithdrawMoney(200);
//if (remainingBal == 200)
//{
//Console.WriteLine(“Test working”);
Assert.AreEqual(200, remainingBal, “Method is returning correct value”);
//}
}
}
}
[/sourcecode]
Comparing both solutions you will find that we used the reference unit.framework namespace. We used various attributes to write test classes and tests.
Use [TestFixture] attribute before the class where you write test method. And [Test] attribute before The test method. If you look at the code, ‘BankingTest’ is the test class and TestBankingTransfers() is a test method. To verify, you can use Assert.AreEqual method. NUnit framework provides various flavors of Assert. Till now, we have learned how to write the basic test in NUnit. In the next section, I will go into details of the test. I will also show you how to execute tests.
HOW TO EXECUTE TESTS:
There are two different ways to run your tests. You can run on the command line using ‘nunit-console.exe’, which is quite fast to launch or use GUI application ‘nunit.exe’, which is windows standalone application and allows you to execute test selectively.
INSTALLATION:
Go to http://nunit.org/index.php?p=download and choose compatible version preferred win: Nunit-2.x.x.msi version and install. By default NUnit will install in C:\ProgrameFiles \NUunit2.x.x directory. You will see folders like bin, doc. In the doc folder, you can get the whole documentation of unit by opening index.html in offline webpage format.
Go to the bin folder and you will see nunit.exe. This is a GUI application. The folder named “framework” contains nunit.framework.dll which we will add in our test as a reference library (explained in later sections).
WRITING TESTS:
Before starting writing tests using NUnit, we need to understand about few terminologies of NUnit.
1. ATTRIBUTES: indicate test classes and methods and to modify their behavior in different ways.
2. ASSERTIONS: test an actual value against expected values and report as pass or fail.
3. CONSTRAINTS: used for assertion i.e. Assert.That( myString, new EqualConstraint(“Hello”) );
4. TEST CONTEXT helps code to get information about the test environment.
ATTRIBUTES:
Attributes are a vital part of the Unit framework which we use to identify test classes and test methods. They can be found in nunit.Framework namespace. Each source file that contains tests must call this namespace using nunit.Framework; statement. And for this, you need to add unit.Framework.dll first for your reference.
In Nunit 2.x.x versions, the NUnit is designed in such a way that you are free to use it anywhere ie. your inherit class can also use these attributes.
Although there are many attributes, we will cover the important ones here.
1. TestAttribute => [Test]
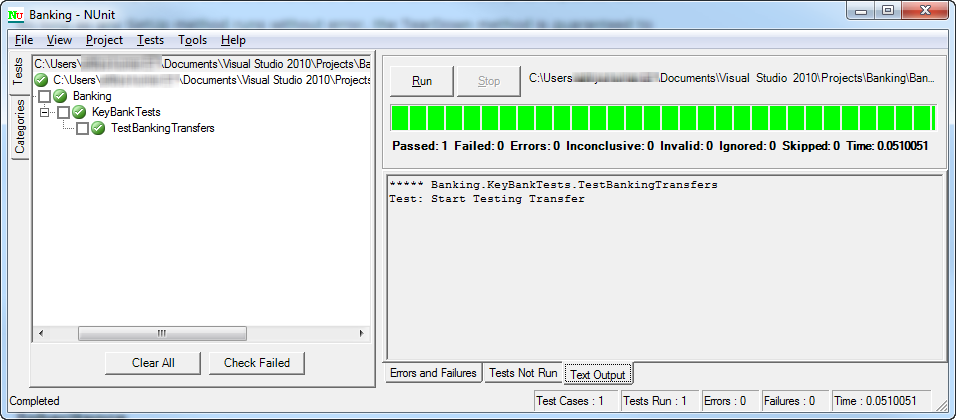
The [Test] attribute is a way to mark method inside a [TextFixture] class as test method. NUnit will recognize inline method as test method and execute that. Refer to the following code.
[sourcecode language=”csharp”]
using System;
using NUnit.Framework;
namespace Banking
{
class KeyBankTests
{
[Test]
public void TestBankingTransfers()
{
Console.WriteLine(“Test: Start Testing Transfer”);
}
}
}
[/sourcecode]
You can parameterize the test method using various attributes.
I will walk you through other attributes like [TextFixture] one by one in more detail.
2. SetupAttribute => [SetUp]
This attribute is to mark a method inside [TestFixture] class which we want to execute before executing each Test method. If there is more than one test, then setup method will execute just before executing the test.
If a SetUp method fails or throws an exception, the test will stop and report a failure or an error.
[sourcecode language=”csharp”]
using System;
using NUnit.Framework;
namespace Banking
{
class KeyBankTests
{
[Test]
public void TestBankingTransfers()
{
Console.WriteLine(“Start Testing Transfer”);
}
[SetUp]
public void OpenBank()
{
Console.WriteLine(“Open Bank in Before Test”);
}
}
}
[/sourcecode]
![[Setup] Attribute](http://learnseleniumtesting.com/wp-content/uploads/2013/08/SetupAttribute.png)
3. TearDownAttribute => [TearDown]
This attribute is to mark a method inside [TestFixture] class which we want to execute after executing each Test method. Once SetUp and Test are executed, TearDown test is executed. If you have more than one test, they will be executed in the following order;
SetUp > Test1 > TearDown > SetUp > Test2 > TearDown
As long as SetUp method runs without any error, it is guaranteed that TearDown test will execute. It will not run if Setup throws an Exception.
[sourcecode language=”csharp”]
using System;
using NUnit.Framework;
namespace Banking
{
class KeyBankTests
{
[Test]
public void TestBankingTransfers()
{
Console.WriteLine(“Test: Start Testing Transfer”);
}
[SetUp]
public void OpenBank()
{
Console.WriteLine(“Setup: Open Bank in Before Test Execution”);
}
[TearDown]
public void CloseBank()
{
Console.WriteLine(“TearDown: Close Bank after Test Execution”);
}
}
}
[/sourcecode]

4. TestFixtureAttribute => [TestFixture]
This attribute assigns a class that contains tests and optionally, setup or teardown methods which we learned in the previous section.
You need to take care of certain rules before assigning a class as [TestFixture].
- Class may be with any access modifier(public, private, protected or internal).
- Class may be static in .NET 2.0+.
- A class cannot be abstract.
- TextFixture with no argument is provided if that class has a default constructor.
- If arguments are provided then they must match one of the constructors.
1. Non-Parameterized Text Fixture:
TextFixture attribute is optional for non-parameterized fixture. As long as the class contains at least one method marked with the [Test], [TestCase] or [TestCaseSource] attribute, this class will be treated as a [TestFixture].
e.g.:
[sourcecode language=”csharp”]<b></b>
using System;
using NUnit.Framework;
namespace Banking
{
[TestFixture]
class KeyBankTests
{
[Test]
public void TestBankingTransfers()
{
Console.WriteLine(“Test”);
}
}
}
[/sourcecode]
![[TestFixture] Attribute](http://learnseleniumtesting.com/wp-content/uploads/2013/08/TestFixture-Attribute.png)
2. Parameterized Text Fixture:
Beginning with version 2.5, test fixtures may take constructor argument. Argument values of TestFixture should match with the constructor of test class. NUnit will construct a separate constructor based on the parameter provided in TestFixture.
e.g.:
[sourcecode language=”csharp”]
using System;
using NUnit.Framework;
namespace Banking
{
[TestFixture(2,4)]
class KeyBankTests
{
private int x;
private int y;
public KeyBankTests(int a, int b)
{
x = a;
y = b;
}
[Test]
public void TestBankingTransfers()
{
Console.WriteLine(x + ” “+ y);
}
}
}
[/sourcecode]

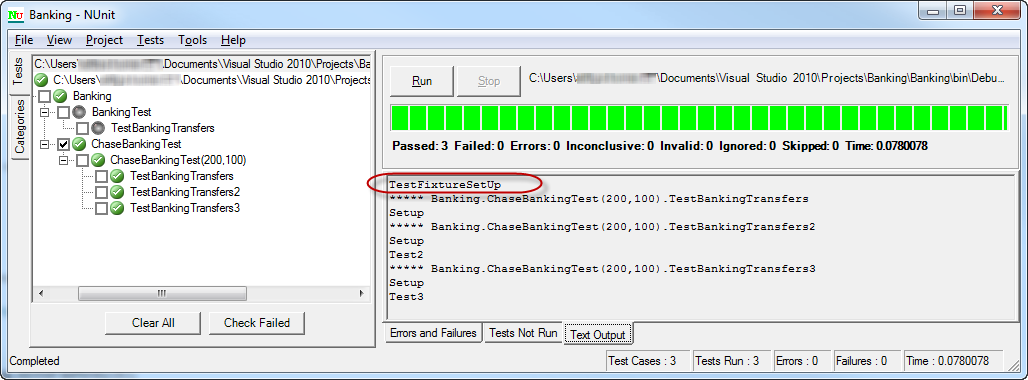
5. TestFixtureSetUpAttribute => [TestFixtureSetUp]
This attribute is used inside TestFixture to assign a method which needs to run before any tests or methods get executed.
If a TestFixtureSetup method fails or throw an exception, none of the tests in TestFixture will execute and reports a failure or an error.
[sourcecode language=”csharp”]
using NUnit.Framework;
using Assert = NUnit.Framework.Assert;
namespace Banking
{
[TestFixture(200,100)]
public class ChaseBankingTest
{
private double a;
private double b;
public ChaseBankingTest(double x, double y)
{
a = x;
b = y;
}
[TestFixtureSetUp]
public void TestFixtureSetUp()
{
System.Console.WriteLine(“TestFixtureSetUp”);
}
[Test]
public void TestBankingTransfers()
{
Banking banking = new Banking();
banking.DepositMoney(a);
banking.DepositMoney(a);
double remainingBal = banking.WithdrawMoney(b);
Assert.AreEqual(300, remainingBal, “Method is returning incorrect value”);
}
[Test]
public void TestBankingTransfers2()
{
System.Console.WriteLine(“Test2”);
}
[Test]
public void TestBankingTransfers3()
{
System.Console.WriteLine(“Test3”);
}
[SetUp]
public void setup()
{
System.Console.WriteLine(“Setup”);
}
}
}
[/sourcecode]
6. TestFixtureTearDownAttribute => [TestFixtureTearDown]
This attribute is used inside TextFixture to provide a single set of functions that are performedafter all tests are executed.
[sourcecode language=”csharp”]
using NUnit.Framework;
namespace Banking
{
[TestFixture(200,100)]
public class PncBankingTest
{
private double a=0;
private double b=0;
public PncBankingTest(double x, double y){a = x;b = y;}
[Test]
public void TestBankingTransfers2()
{
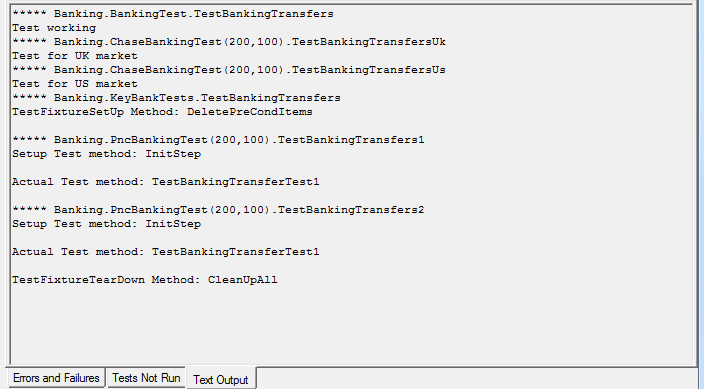
System.Console.WriteLine(“Actual Test method: TestBankingTransferTest1\n”);
}
[Test]
public void TestBankingTransfers1()
{
System.Console.WriteLine(“Actual Test method: TestBankingTransferTest1\n”);
}
[SetUp]
public void InitStep()
{
System.Console.WriteLine(“Setup Test method: InitStep\n”);
}
[TestFixtureSetUp ]
public void DeletePreCondItems()
{
System.Console.WriteLine(“TestFixtureSetUp Method: DeletePreCondItems\n”);
}
[TestFixtureTearDown]
public void CleanUpAll()
{
System.Console.WriteLine(“TestFixtureTearDown Method: CleanUpAll\n”);
}
}
}
[/sourcecode]
If you look at the code there are two Test methods and steps of execution look like this.
![[TestFixtureTearDown] executes in the last](http://learnseleniumtesting.com/wp-content/uploads/2013/08/TestFixtureTearDown.png)
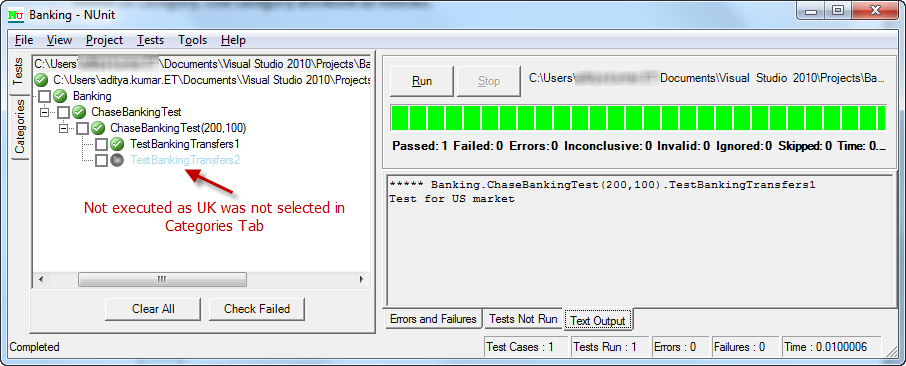
7. CategoryAttribute => [Category(“Some Name“)]
Category attribute provides an alternative way to group the tests in suites. You can categorize test methods or TextFixtures in various groups and while running test suite you can selectively choose tests based on the category. Use category attribute as follows.
[sourcecode language=”csharp”]
using NUnit.Framework;
namespace Banking
{
[TestFixture(200,100)]
public class ChaseBankingTest
{
private double a;
private double b;
public ChaseBankingTest(double x, double y)
{
a = x;
b = y;
}
[Test]
[Category(“US Market”)]
public void TestBankingTransfers1()
{
System.Console.WriteLine(“Test for US market”);
}
[Test]
[Category(“UK Market”)]
public void TestBankingTransfers2()
{
System.Console.WriteLine(“Test for UK market”);
}
}
}
[/sourcecode]
There are many more test attributes which I will cover later in WhiteBox testing section. For now, this information should be sufficient for beginners.
ASSERTION:
The assertion is the core of any unit test framework and NUnit is no exception. NUnit provides static methods in assert class.
If an assertion fails, the method call does not return but reports a failure. Additionally, failure of one assertion terminates the execution of any subsequent assertions. For this reason, it is not recommended to use more than one assert per test method.
Equality Asserts:
These methods test whether two items are equal. Overloaded methods are provided to test various input values like string, int, double, decimal etc. so other languages can use as required.
Eg.
[sourcecode language=”csharp”]
Assert.AreEqual( int expected, int actual );
Assert.AreEqual( int expected, int actual, string message );
Assert.AreNotEqual(int expected, int actual, string message, params object[] parms )
[/sourcecode]
You can explore others in visual studio using intellisense.
Condition Asserts:
These methods test condition provided in first arguments. And optionally other arguments for a message.
Few important condition asserts are as follows.
Eg.
[sourcecode language=”csharp”]
Assert.IsTrue( bool condition );
Assert.True(bool condition)
Assert.IsEmpty( string aString );
[/sourcecode]
You can explore others in visual studio using intellisense.
Comparison Asserts:
These methods compare if one object is greater than another one. There are four types of comparison assertion.
Eg.
[sourcecode language=”csharp”]
Assert.Greater( int arg1, int arg2 );
Assert.GreaterOrEqual( int arg1, int arg2 );
Assert.Less( int arg1, int arg2 );
Assert.LessOrEqual( int arg1, int arg2 );
It compares the first argument with the other. Assert.LessOrEqual( 3, 4 ); is true.
[/sourcecode]
You can explore other arguments in visual studio using intellisense.
This is good for reference. We will go into more details in White Box Testing section.
RUNNING TESTS:
There are two ways to execute tests.
Console Runner: nunit-console.exe to execute tests in a batch.
And GUI Runner: nunit.exe, provides an interactive way to select test or category before running. You can see the result and command and code from UI. GUI Runner is a bit slower than console runner but has a better way to handle tests.
There are other ways to execute tests using third party software or directly from Visual Studio but here we will talk about only above two methods.
Console Runner:
Console Runner is the fastest way to execute unit tests. It is a text-based test execution tool and is used when you want to execute all the tests and do not want the interactive icons to get status for passed/failed tests.
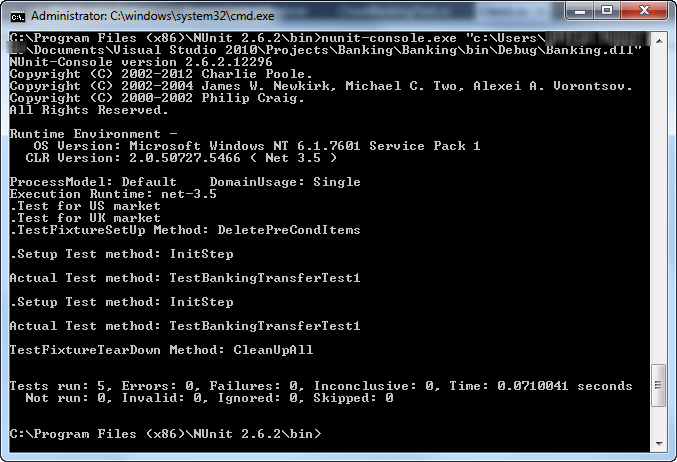
I enabled all tests and executed using command nunit-console ‘Test dll file’ in the screenshot.
Note: It’s recommended that you add the path of Nunit-console executable into your PATH variable so you do not need to navigate there every time. You can directly execute tests without any hassle.
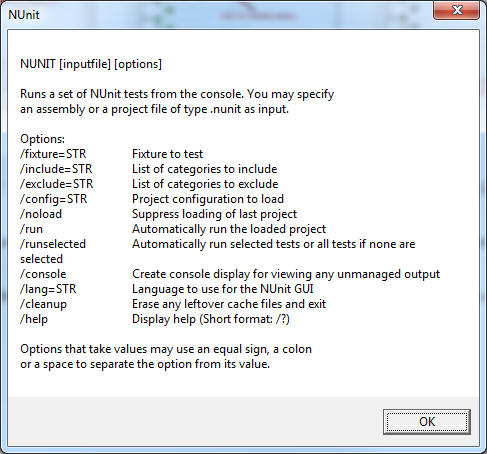
Use the following command to get all the options to use console runner:
Nunit-console.exe /help
I will just talk about the important option which we need to execute our tests.
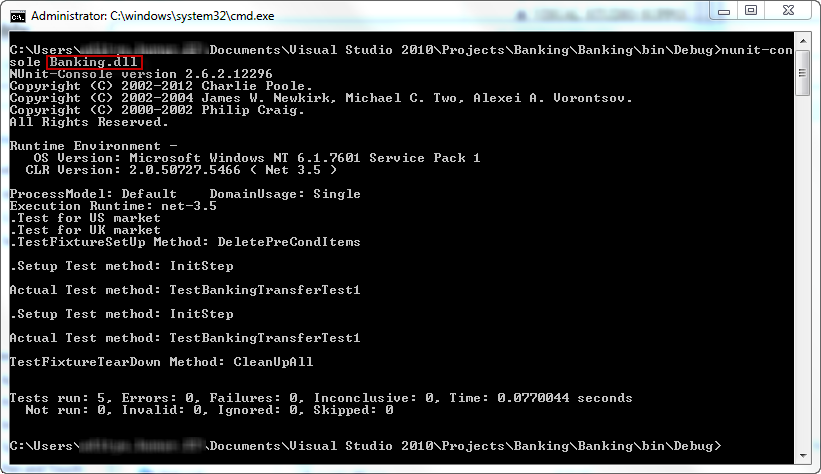
Specify an Assembly:
Assemblies contain test codes ie. to run the tests contained in the Banking.dll, use the following command:
NUnit-console <Assembly Name >
Specify an Assembly and a Test Run:
If you want to execute a specific test from a set of tests given in assembly, you need to use
/run:<Testname> command with above command
Nunit-console /run:TestBankingTransfersUs Banking.dll
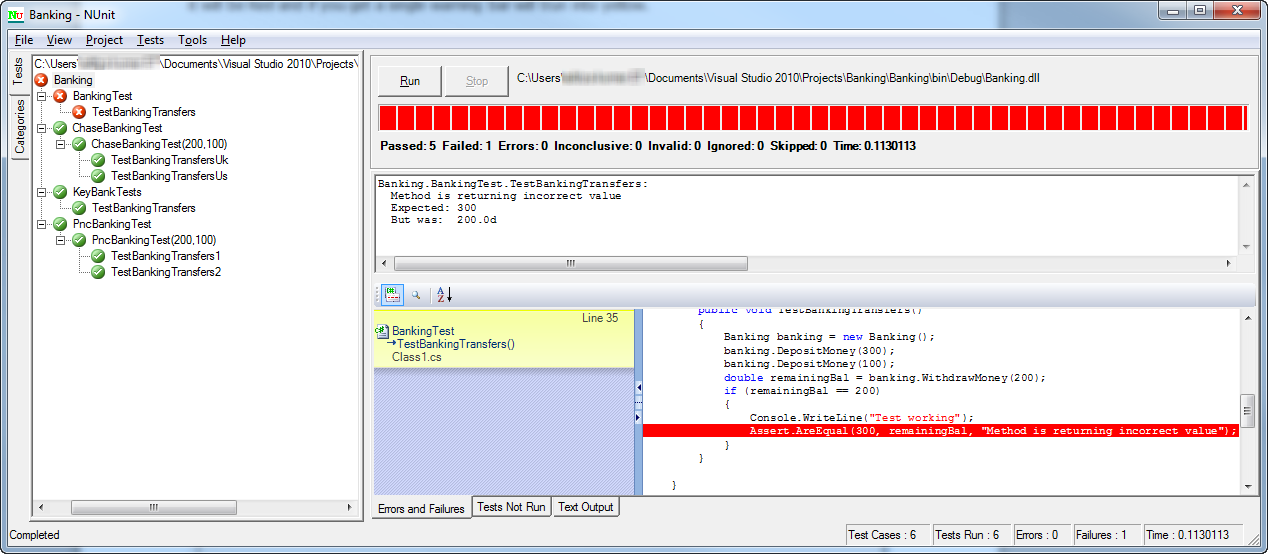
GUI RUNNER:
Nunit.exe is gui runner for tests where you can perform selective testing. You will get a result in a very fancy way by seeing green red or yellow icons. A progress bar tells the status of your tests execution.
To select the tests, you need to locate the test assembly and click on Run button in the right column.
I would like to mention a few things here
Progress Bar:
The progress bar tells you the overall status of tests. If all tests are passed, it’s green but even if a single test fails, it will be red and if you get a single warning, the bar will turn into yellow.

Result Summary:
At the end of the test run, a summary of the test result will display below the progress bar.

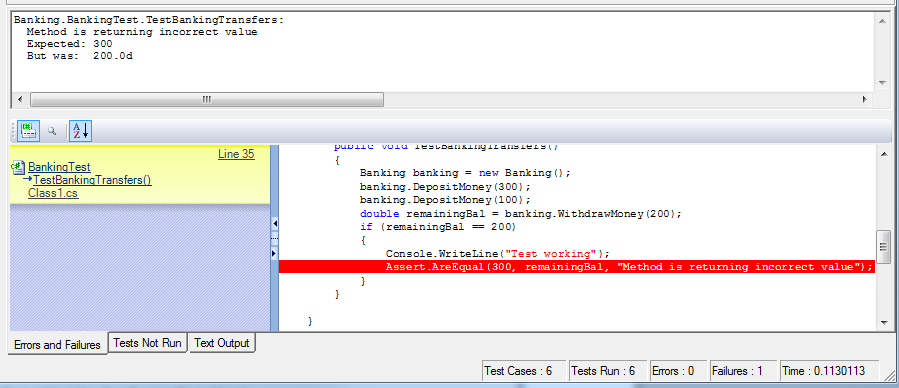
Error And Failures Tab:
In case if some tests fail, you will get the summary of tests failure and details in this tab. First column shows which method failed and the right side shows the exact code which caused the failure.
Text Output tab:
If you are sending output on to the console you will see the output on this tab. You can see what tests are running etc.
Footer Summary:
You can see the summary at the bottom about the number of test cases, error failures etc.
![]()
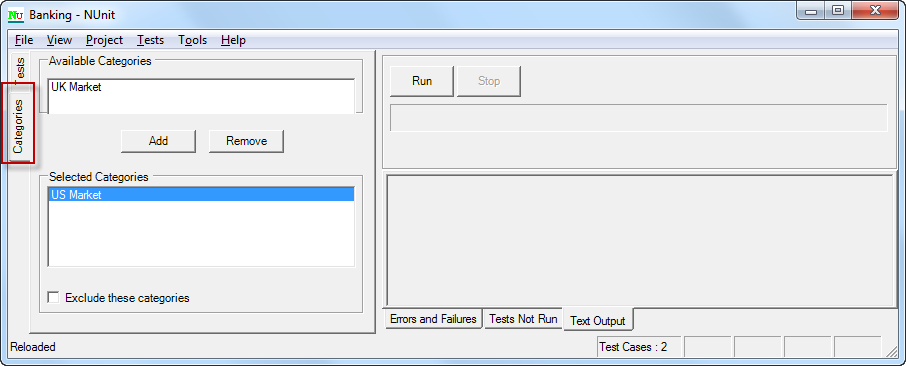
Category Tab:
Click on the Category tab on the left side below Tests. If your tests have category attribute, those will appear here. You can select and click on Add to select the category or double-click. Selected category will move to ‘Selected Categories’ section and if you move back to Tests tab, you will see all tests become inactive but the selected categories.
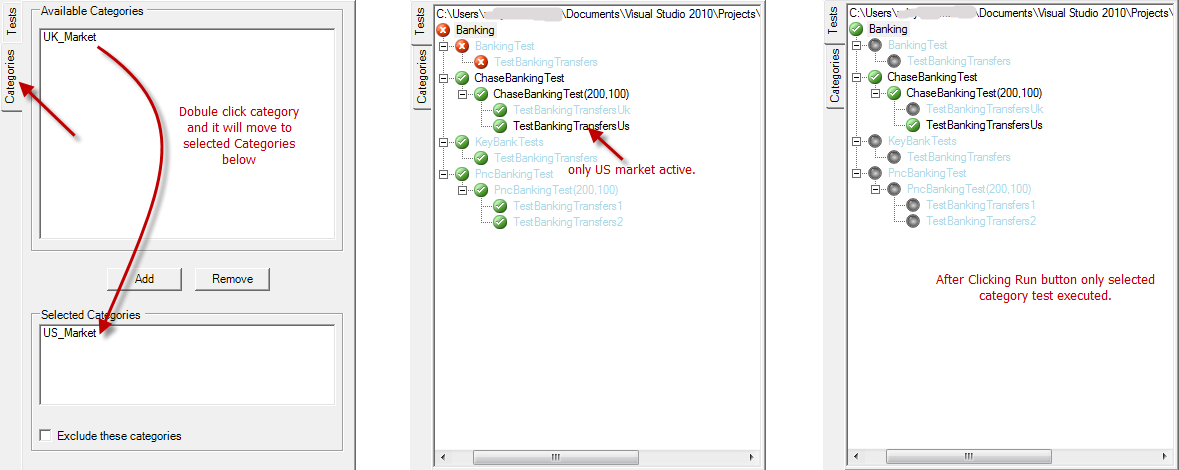
If you hit the Run button only selected will execute.
You can do all above via the command line like launching GUI runner, selected tests and selecting categories etc.
Go to command line and type nunit /? You will get various options and description to that you execute the test.
I hope you liked this article. Don’t forget to leave your comment below. If you have any question please let me know. Or email me [email protected]. I will be more than happy to respond.
I would like to give you a big thanks for this wonderful tutorial.
Thanks Ifti.
Atlast a simple and easy to understand type blog! Thanx a lot!
Thanks Ashwin for kind comment!
Wow! finally finally some simple easy to understand tutorial for beginners. If you can provide all methods that are available for NUnit would be great.
Excellent!
Hi AC,
Please refer : http://nunit.org/index.php?p=docHome&r=2.6.4 for detailed documentation.
Thanks Aditya for the Tutorial. Its really helpful man!
Can you tell me why do we use Nuget
and
which method is advantageous to use: Run tests directly from Visual Studio test framework or NUnit?
NuGet is used to keep third party assemblies up to date from their original source or repositories. it can automatically detect new versions and allow one to download new versions.
Hey Nikunj,
Running from Visual Studio is always better as you have more control. The video compiled on older version of Visual Studio when there was no support for Test in express edition. But in later edition ie VS2013, it supports Nunit Tests.
For NuGet, Michael answer is correct.
I have just read this tutorial. It good for beginners to start Nunit from scratch. Looking forward to see more more details of missing features. Thanks
Muhammad Asim Rana
I needed a quick tutorial on NUnit and this was perfect!
Great work – Thanks
A great way to start with NUnit Framework. Short and Crispy. Thanks very much.
Thank you for the nice comment. I am glad that it is helpful for you. if you have any other idea and you want a blog on that, please do not hesitate to share with us.