Introduction:
Appium is an open source automation tool to test native, webview and hybrid application in iOS and Android devices. Native apps are written using iOS or Android SDK. Mobile web apps are web apps access by browsers like chrome or safari. Hybrid apps are a wrapper around webview, a native control that interacts with webview. Cordova PhoneGap or Ionic apps are the wrapper around web technologies and bundled into native UI libraries.
Appium is a “class-platform” test tool that means you can use Appium APIs to write automation for iOS and Android.
Support:
| Support | iOS | Android |
| Operating System | Mac OS X > 10.7 | Windows, Linux, Mac OS X |
| Version | 7.1, 8.0, 8.1, 8.2, 8.3, 8.4, 9.0, 9.1, 9.2 and 9.3 | 2.3 and up |
| Devices | iPhone Simulator, iPad Simulator, and real iPhones and iPads | Android emulators and real Android devices |
| Hybrid App | Yes ( for real devices, iOS-webkit-remote-debugger required) | Yes |
| Native App | Yes
Debug .app ver in simulator Registered. ipa in real device |
Yes |
| Mobile Web App | Yes | Yes |
| Multiple Apps in Single Session | No | Yes (no selendroid) |
| Multiple device | No | Yes |
In this tutorial, we will use Java to write automation scripts. Instead of talking too much about the introduction, let’s start working on this.
Core Concepts
Appium is based on five core concepts:
Client Server Architecture:
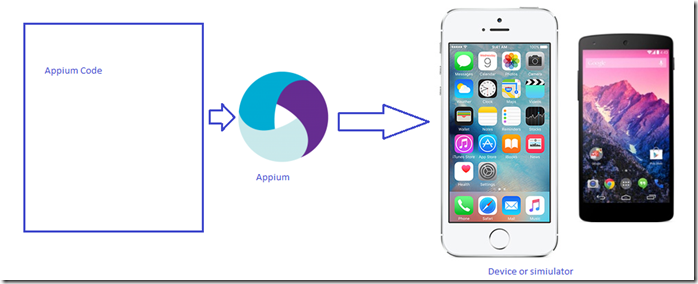
Appium is based on CSA and it’s actually a web server with REST API. It receives connections from the client, accept and process commands and execute those commands on a mobile device and return the response back to the client. Being web server based on REST API gives us an advantage that we can use any language that has REST API and easy to communicate with Appium API to write our test code like Java, Ruby, .NET, PHP etc.
Session:
Appium always performs automation in session. The client establishes a session with the server and sends commands that end up sending /POST session with a JSON Object, called Desired Capabilities Object. At this point, the server establishes a connection with sessionID which can be used to perform further commands.
Desired Capabilities:
Desired capabilities are the combination of keys and value like map or hash where you can assign and send various setting for automation to the server. If you want to test on the device you can send platform name as “iOS” or “Selendroid”. There are multiple settings on the desired capabilities which you can send. Refer here for list of desired capabilities.
Appium Server:
Appium server is written in node.js. This processes your test code and executes on device or simulator.
Appium Client:
There are multiple libraries( Java, Ruby, .NET, Python etc.) which supports Appium’s extension to the WebDriver protocol.You need to these libraries instead of WebDriver libraries.
Installation:
Mac OS X
If you are using the mac then I assume that you are using latest and greatest version of OS X. For Appium on mac, OS X 10.10 is recommended.
Install Xcode from app store.
Install latest and stable version of ruby:
$ \curl -sSL https://get.rvm.io | bash -s stable
$ rvm install ruby
Install bundler and ruby gem:
$ gem update –system
$ gem install –no-rdoc –no-ri bundler
$ gem update
$ gem cleanup
Make sure that Ruby Gem is >=2.1.5
$ gem –v
Install appium_console gem
$ gem uninstall -aIx appium_lib
$ gem uninstall -aIx appium_console
$ gem install –no-rdoc –no-ri appium_console
$ Install flaky gem
$ gem uninstall -aIx flaky
$ gem install –no-rdoc –no-ri flaky
$ Install brew
$ ruby -e “$(curl -fsSL https://raw.githubusercontent.com/Homebrew/install/master/install)”
Install nodejs using brew.
Make sure that you are using node version higher than 0.0.6.
$ brew update
$ brew upgrade node
$ brew install node
$ node -v
$ Install grunt
$ grunt –version
$ grunt-cli v0.1.13
$ grunt v0.4.2
install Ant
$ brew install ant (quick and easy) OR
Try following steps.
Apache Ant is a Java library and command-line tool that help building software. To install that go to http://ant.apache.org/bindownload.cgi and download tar.gz
Open terminal and go to the download folder where you have downloaded apache-ant-X.Y.Z-bin.tar.gz
Go to Download folder
$ cd ~/Downloads
Extract the folder
$ tar -xvzf apache-ant-1.8.1-bin.tar.gz
Make sure that /usr/local exists
$ sudo mkdir -p /usr/local
Copy ant files into /usr/local folder
$ sudo cp -rf apache-ant-1.8.1-bin /usr/local/apache-ant
Add the new version of Ant to future terminal sessions
$ echo ‘export PATH=/usr/local/apache-ant/bin:”$PATH”‘ >> ~/.profile
Verify new version of ant
$ ant –version
Install maven >= 3.1.1.
$ brew install maven (if you get 404 error, try brew update and try again)
Now you are ready to go for next step.
Setup App-Under-Test, Appium, and Appium Inspector
Setup Demo App Under Test:
Now you have setup your computer for write automation script to test your app. I create a sample app for this. App under test is a hybrid app build using ionic. To build and view the app, you need to install ionic first which is quick.
$ npm install -g cordova ionic
Once the installation is done. Clone the following code.
$ git clone [email protected]:learnseleniumtesting/AppiumTestApp.git
$ cd AppiumTestApp
$ ionic platform add ios
$ ionic build ios
$ ionic emulate ios
App will start an emulator. This app has two side menus, one for home and other is in basic form. On the basic form, there are two text fields, first and last name respectively and one submit button. This capitalizes your first and last name and print on the screen. We will use this application to write very basic automation test and execute on an emulator.
These are following screens in the app.
After building iOS platform, you will find a folder for app you need to save that location which you need to setup appium app.
/Users/administrator/Documents/dev/ionicapps/AppiumTestApp/platforms/ios/build/emulator/AppiumTestApp.app
Save above URL because you need this in appium code and appium inspector.
Appium And Appium Inspector:
If you are new to appium then please go through previous chapters. If you have done all and want to install appium inspector then please download the latest version of the appium.dmg file. ( https://bitbucket.org/appium/appium.app/downloads/)
Note: It may appear that file not downloaded as the download file will be like “Unconfirmed 247104.crdownload”. Rename this file to appium.dmg.
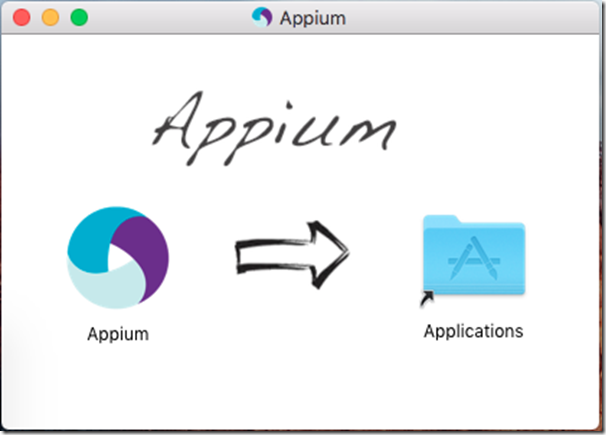
Click on the appium.dmg to mount the disk image.
Drag and Drop Appium to the Application folder.
Go to application and start appium. You are ready to use appium and appium inspector.
Appium:
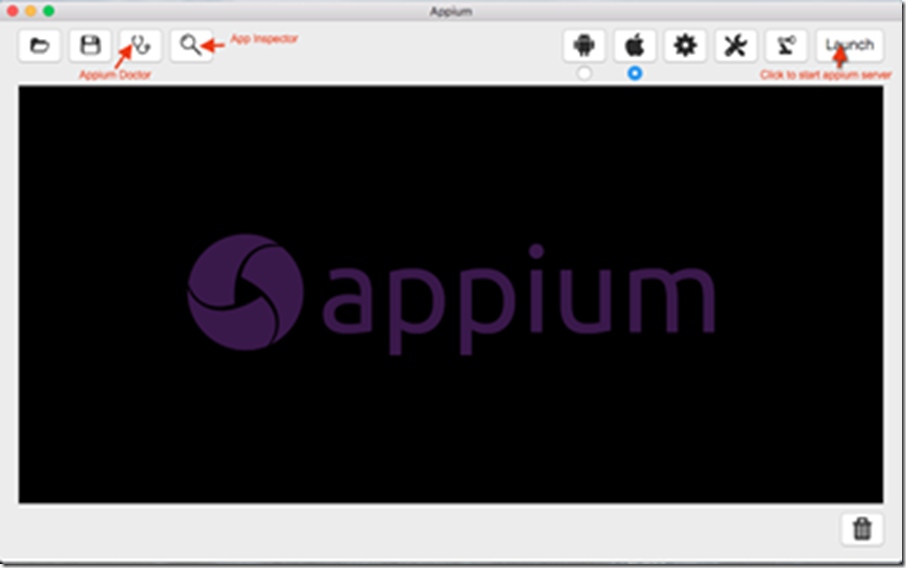
Go to Application and start Appium. You will so see the following screen.
Appium Doctor:
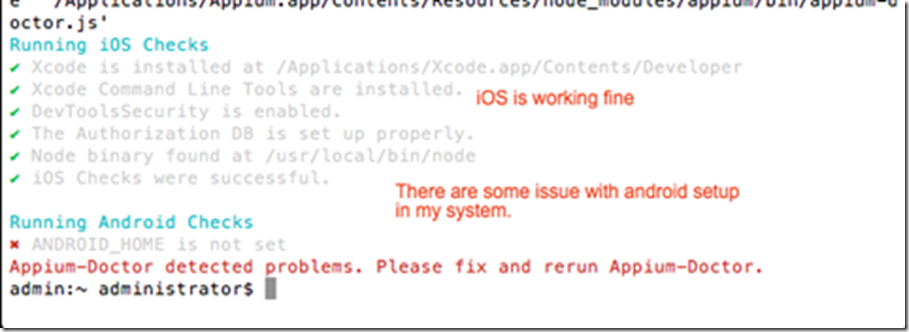
This is to diagnose and fix the common issue related to the node, iOS, and Android configuration.
Appium Server:
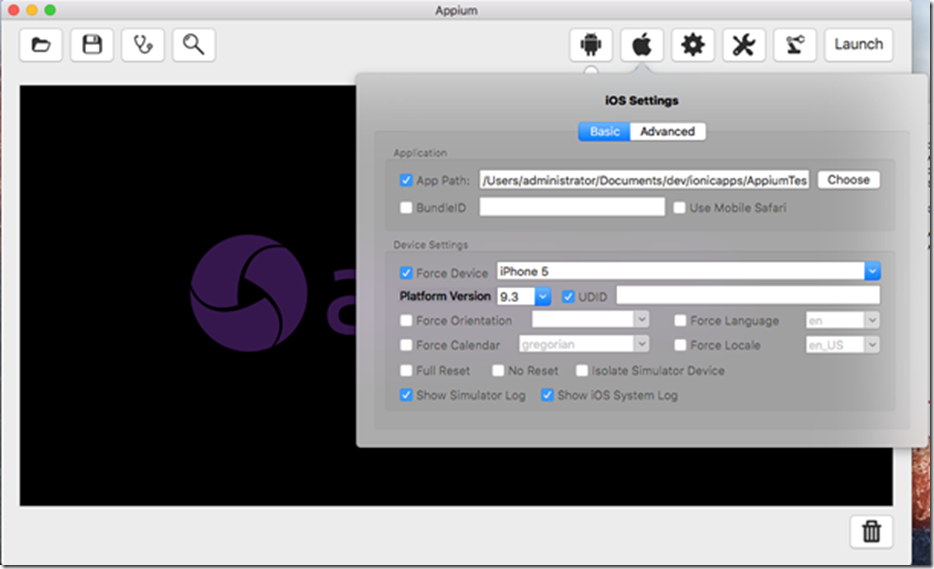
Click to start the Appium server. By default, it starts on port 4723. Before starting the server, you need to setup your app to either Android or iOS. I am going to setup iOS. Click on the apple icon on the Appium.
Here we will discuss basic configuration:
1. App Path: Path of the .app file for application under test. In the previous chapter, you build iOS, using command ‘ionic build ios’ which will app folder for iOS and that you can add in APP Path;
(/Users/administrator/Documents/dev/XXXX/AppiumTestApp/platforms/ios/build/emulator/AppiumTestApp.app)
2. Check ‘Use Mobile Safari’ if you are testing mobile website.
3. In Device Setting, you can choose the type of device and corresponding iOS version based on the environment under test. If you want to run on an actual device then provide your UDID.
4. Choose the option to see the iOS system and simulator log.
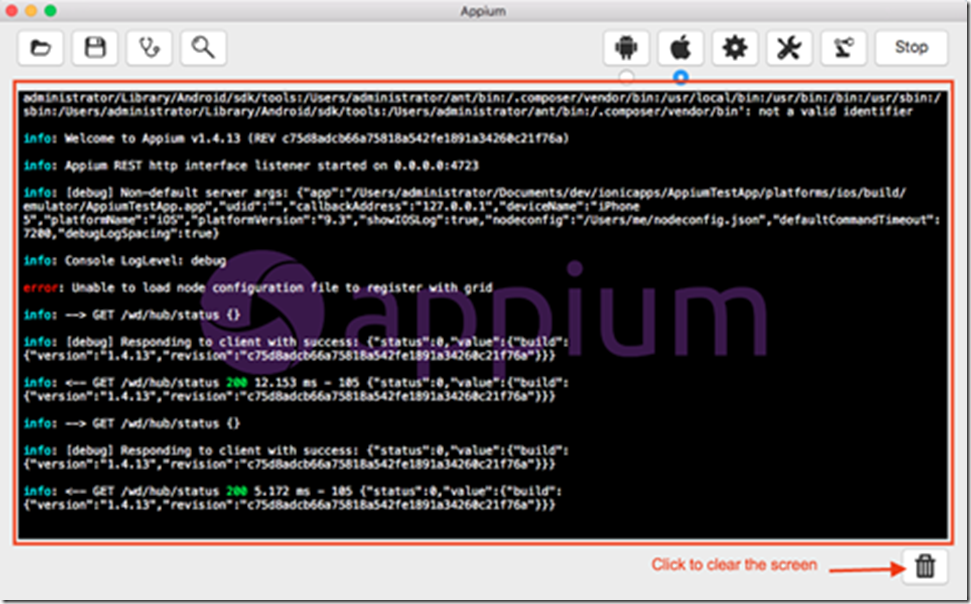
Click on apple icon to close this dialog. Now click on “Launch” button. This will start the appium server for and you can see similar info on the appium console.
If you are seeing too many things on the console and getting difficult to follow along then you can delete the log from console by clicking trash can icon button as given above.
Appium Inspector:
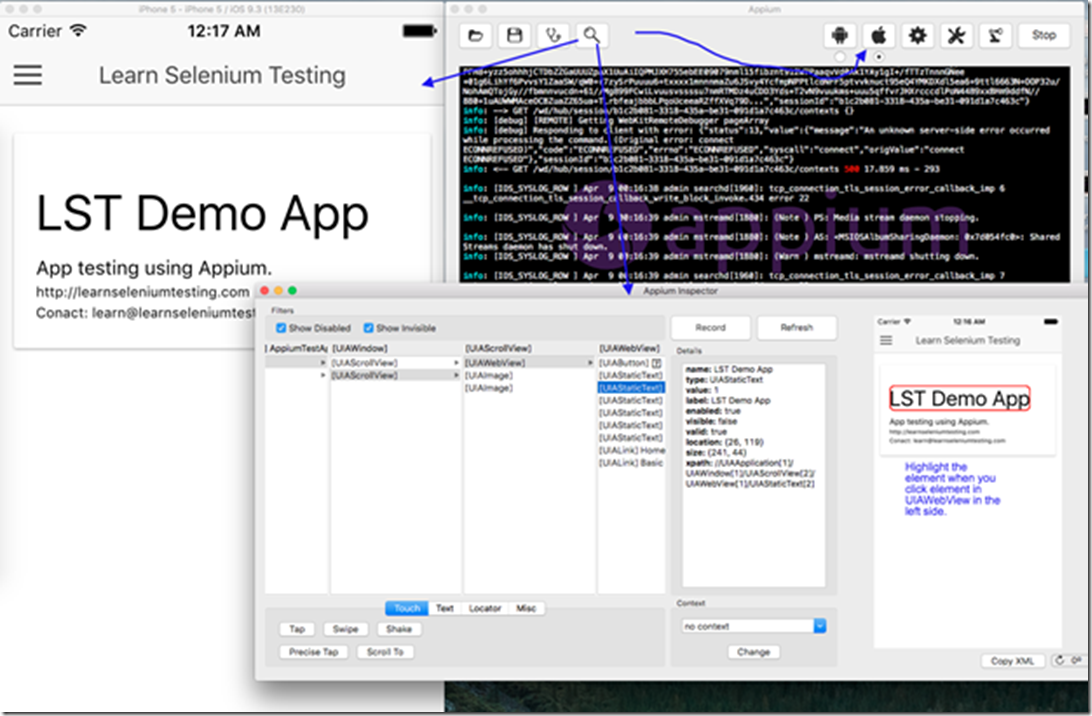
Start the server. Click on the lance icon on Appium. This will start the application in the emulator and start the inspector as well.
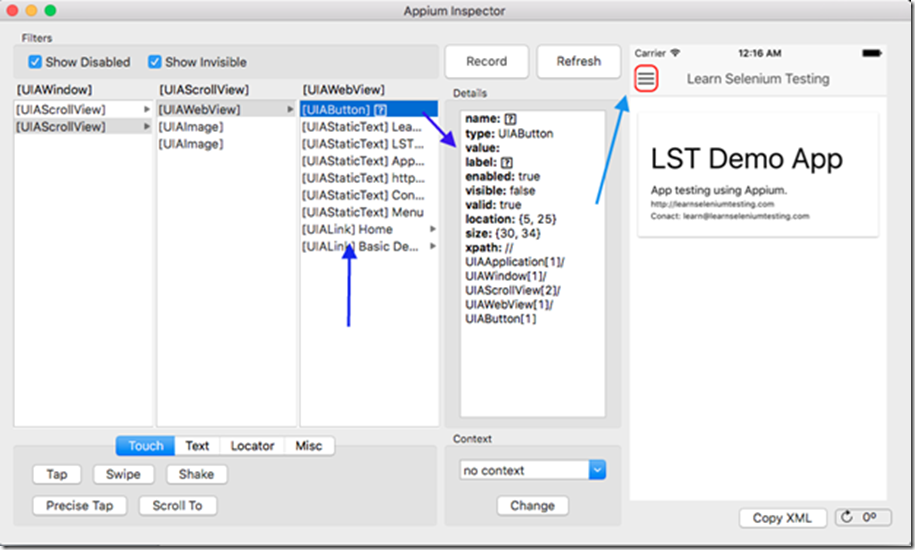
Detailed view of Inspector:
You need to use the XPath to find the element in our automation code. You will use that in the later chapter.
I think this should be enough to write a basic script to perform an automation scenario using Appium.
Write your basic automation script.
In the end of the previous chapter, you were able to setup Eclipse with all libraries needed for writing automation test. And now you are ready with your application opened in Appium tester and you are able to navigate throughout your application in the emulator and refresh the Appium inspector it will update the screen and update all elements present in the screen.
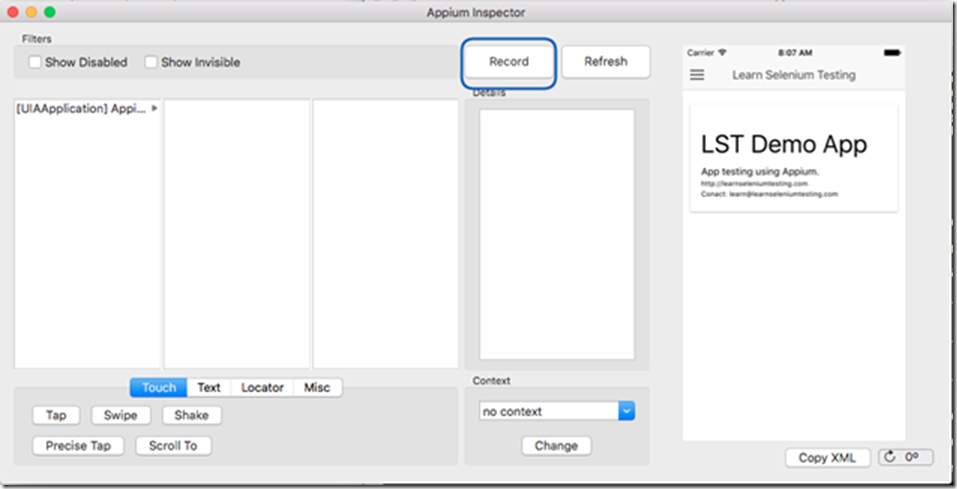
There is ‘Record’ button on the Appium inspector
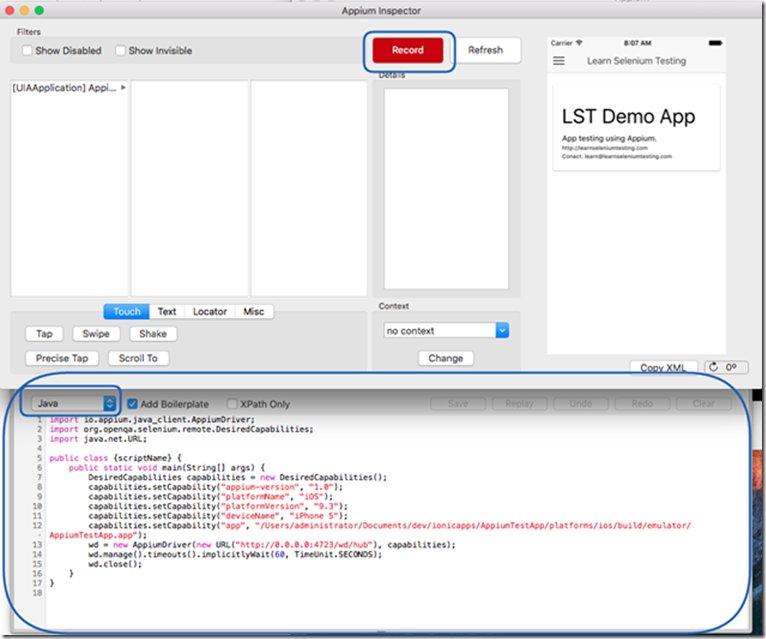
This will turn into RED and this will launch code editor on the bottom side of Appium Inspector. You can change the choice of language you want. We will choose Java.
You will utilize these code in next chapter when we will actually start writing our code
Setup Project and write code in Eclipse IDE
Download required Libraries for Appium:
Since you already have installed and setup Eclipse so before going to the tool I would like you to download required WebDriver and Appium libraries that is required by our automation script.
Appium Java Client:
Download latest Appium java client from maven
Click on the latest version to download. Save this file to a specific folder as per your choice.
Webdriver Java client:
Download WebDriver java client from selenium official website www.seleniumhq.org/download/
Unzip the file and save extracted file/folder in the same folder you saved Appium-java client.
Start Eclipse and select a workspace.
You will get blank eclipse workspace.
Right click on the package explorer and create new project (New -> Java Project)
Choose any name for your project and click “Next” button.
Click on Finish button to complete the process.
Now you will have a project created that you can see in package explorer.
Go to the property of the Java project to add supporting libraries for Appium and selenium beforehand.
Choose JavaBuildPath and go to Libraries tab and click on Add External JARs.
And choose all jar files Appium and WebDriver folder and subfolders.
All those added jars will appear in Referenced Libraries as below:
Now add the test class. Src -> right click -> New -> Class.
Name the package as com.Appiumtesting and Name of the class is AppiumiOSTest. You can choose name as per your need. Click Finish once you are done.
You will get following standard code in the class.
Now you have got the skeleton of your code. You will not be able to run any test so far.
Start Writing Automation Test:
Replace the content of AppiumiOSTest.java file with following code.
[gist id=62f18da1de65db4db1ceeb90a336f962]
XPath value will come from Appium inspector. You just need to change the screen to screen and click the refresh button on Appium inspector and locate element and copy the XPath.



![clip_image002[5] clip_image002[5]](https://learnseleniumtesting.com/wp-content/uploads/2016/04/clip_image0025_thumb1.png)
![clip_image004[5] clip_image004[5]](https://learnseleniumtesting.com/wp-content/uploads/2016/04/clip_image0045_thumb1.png)

![clip_image002[9] clip_image002[9]](https://learnseleniumtesting.com/wp-content/uploads/2016/04/clip_image0029_thumb1.png)
![clip_image004[9] clip_image004[9]](https://learnseleniumtesting.com/wp-content/uploads/2016/04/clip_image0049_thumb1.png)
![clip_image006[4] clip_image006[4]](https://learnseleniumtesting.com/wp-content/uploads/2016/04/clip_image0064_thumb1.png)
![clip_image007[7] clip_image007[7]](https://learnseleniumtesting.com/wp-content/uploads/2016/04/clip_image0077_thumb1.png)
![clip_image009[7] clip_image009[7]](https://learnseleniumtesting.com/wp-content/uploads/2016/04/clip_image0097_thumb1.png)
![clip_image011[9] clip_image011[9]](https://learnseleniumtesting.com/wp-content/uploads/2016/04/clip_image0119_thumb1.png)
![clip_image013[8] clip_image013[8]](https://learnseleniumtesting.com/wp-content/uploads/2016/04/clip_image0138_thumb1.png)
![clip_image014[4] clip_image014[4]](https://learnseleniumtesting.com/wp-content/uploads/2016/04/clip_image0144_thumb1.png)
![clip_image016[4] clip_image016[4]](https://learnseleniumtesting.com/wp-content/uploads/2016/04/clip_image0164_thumb1.png)
![clip_image018[4] clip_image018[4]](https://learnseleniumtesting.com/wp-content/uploads/2016/04/clip_image0184_thumb1.png)
![clip_image020[4] clip_image020[4]](https://learnseleniumtesting.com/wp-content/uploads/2016/04/clip_image0204_thumb1.png)
![clip_image022[4] clip_image022[4]](https://learnseleniumtesting.com/wp-content/uploads/2016/04/clip_image0224_thumb1.png)
![clip_image023[4] clip_image023[4]](https://learnseleniumtesting.com/wp-content/uploads/2016/04/clip_image0234_thumb1.png)
![clip_image025[4] clip_image025[4]](https://learnseleniumtesting.com/wp-content/uploads/2016/04/clip_image0254_thumb1.png)
![clip_image027[4] clip_image027[4]](https://learnseleniumtesting.com/wp-content/uploads/2016/04/clip_image0274_thumb1.png)
![clip_image029[4] clip_image029[4]](https://learnseleniumtesting.com/wp-content/uploads/2016/04/clip_image0294_thumb1.png)