WebDriver Test using C# and Visual Studio 2013 Express.
One of my videos is getting multiple hits for how to write WebDriver or selenium tests using C#. There are many tutorials available on the internet for Java but not many for WebDriver and C#. I will teach you how to write test scenario in C#. I have Visual Studio 2013 express edition.
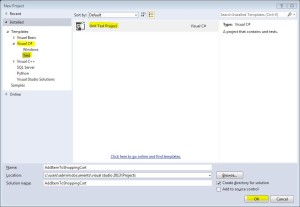
Step1: Create WebDriver Project
Create new Project, and choose ‘Unit Test Project’, and give some name says; ‘AddItemToShoppingCart’ and hit the OK button.
You will see following folder structure and if you open UnitTest1.cs, you will see the code

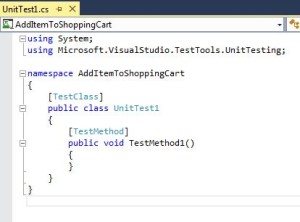
Rename the file, UnitTest1.cs to some logical name and class name inside the code as well.
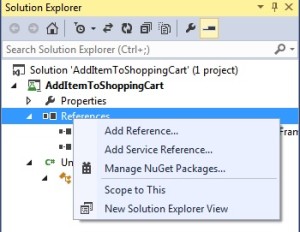
Step2: Add WebDriver into reference.
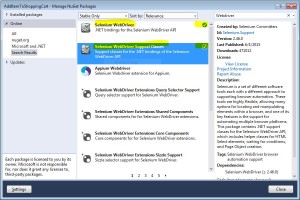
Go to Manage NuGet Packages and search for WebDriver.
Select the latest version of WebDriver and Selenium WebDriver Support Classes item and click Install button to install.
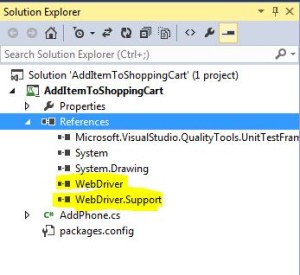
After installation, you can see WebDriver and WebDriver.support in Reference under Solution Explorer.
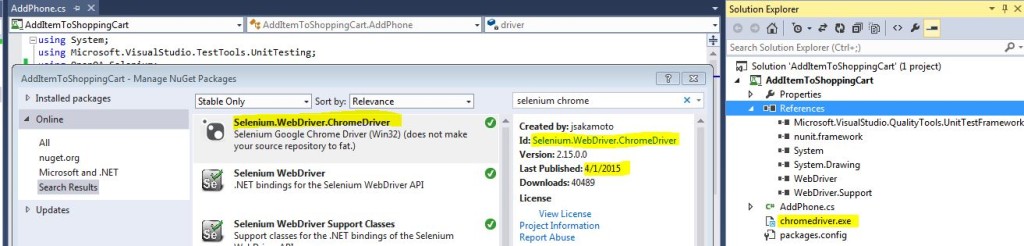
Search ‘Selenium chrome’ and install Chrome Driver that will add chromedriver.exe to your project.
Step 3 (optional if you want to use NUnit instead of inbuilt UnitTestFramework in Visual Studio)
Now to you need to install NUnit before writing NUnit. Search NUnit in NuGet Package and Install. To use lean more about NUnit and attributes, please refer Learn Nunit tutorial. In this Tutorial, I will Use predefined Unit Test Framework and its attributes.
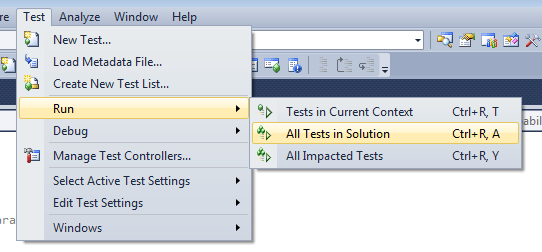
Step 4: Write WebDriver Code
Now real implementation starts here. This article will talk about Visual Studio Unit Test tool which is even new to me too. This UnitTest namespace has three main test attributes which I am going to use.
- The [TestClass] attribute is required in Microsoft Unit Test Framework for any class that contains Test method and you want to run in Test Explore. Class with Attribute [TestClass] must have Test method.
- The [TestMethod] attribute is to assign a method inside [TestClass] to run actual test code.
- The [TestInitialize] attribute need to assign to the method which runs prior to running any [TestMethod] attribute method.
- The [TestCleanup] attribute method is to run after [TestMethod] method.
[TestInitialize] attribute method will have the code to do all setup like defining any variable required for code, initializing WebDriver, opening URL etc.
[TestMethod] attribute method will have actual test code which will run after [TestInitialize] and all kind of action and verification will take place in this method.
[TestCleanup] attribute method will have code to clean up all kind of setting or action like removing any special setup or log out from the application and close application. This method can have the code to prepare the reports etc.
Test Explorer will show only methods with the attribute [TestMethod].
Step5: Start Writing Code
This section will have real coding.
We have two scenarios to implement
- We want to open an e-commerce website and pick nexus phone and add into the cart and verify if the cart has that item before proceeding to checkout.
- Check if you can open find makeup brush.
If you write both scenarios in steps:
| Scenario 1 | Scenario 2 |
| 1. Open Brower2. Open the application under test says donethedeal.com3. Click on nexus phone link that will take you to the description page.4. Click on Add to Cart and wait for confirmation if phone added to cart.5. Open Cart link from the top menu and verify if Phone is present there.
6. Close the browser. |
1. Open Browser2. Open application under test says: donethedeal.com3. Open brush page4. Verify that if item has description of brush
5. Close the browser. |
If you check above you will see that we have common steps in both scenarios which we can move to common area for each scenario and that will go to [TestInitialize] and the last step in [TestCleanup.]
Before writing actual code, you need to add the reference for selenium into the code as follows;
[sourcecode language=”csharp”]
using OpenQA.Selenium;
using OpenQA.Selenium.Chrome; //to use google chrome browser.
using OpenQA.Selenium.Support;
[/sourcecode]
[TestInitialize]
In this step you need to initialize the browser, let’s say Firefox using Firefox Driver. You initialize interface IWebDriver in the [TestClass] that controls the browser and have URL for application under test so these will be available across the class.
Now you need to initialize the Firefox/chrome browser and once it is open, you need to open the url to cover step 1 and step2.
[sourcecode language=”csharp”]
using System;
using Microsoft.VisualStudio.TestTools.UnitTesting;
using OpenQA.Selenium;
using OpenQA.Selenium.Chrome;
using OpenQA.Selenium.Support;
using ExcelReader;
namespace AddItemToShoppingCart
{
[TestClass]
public class VerifyItems
{
IWebDriver driver;
string url = "http://learnseleniumtesting.com/demo/";
[TestInitialize]
public void TestSetup()
{
driver = new ChromeDriver();
driver.Navigate().GoToUrl(url);
}
}
[/sourcecode]
[TestCleanup]
This attribute method will run at the end so we want to close the browser here. You just need to call the driver.Quit() to close the browser.
[sourcecode language=”csharp”]
[TestCleanup]
public void Cleanup()
{
driver.Quit();
}
[/sourcecode]
[TestMethod]
The method with this attribute will contain the actual code. Create a public method with some logical name and assign the attribute. For now, keep the method blank build the solution.
Overall code should look like this;
[sourcecode language=”csharp”]
using System;
using Microsoft.VisualStudio.TestTools.UnitTesting;
using OpenQA.Selenium;
using OpenQA.Selenium.Chrome;
using OpenQA.Selenium.Support;
namespace AddItemToShoppingCart
{
[TestClass]
public class VerifyItems
{
IWebDriver driver;
string url = "http://learnseleniumtesting.com/demo/";
[TestInitialize]
public void TestSetup()
{
driver = new ChromeDriver();
driver.Navigate().GoToUrl(url);
}
[TestCleanup]
public void Cleanup()
{
driver.Quit();
}
[TestMethod]
public void AddPhoneToCartAndVerifyInCart()
{
//This is the placeholder to write actual code.
}
}
}
[/sourcecode]
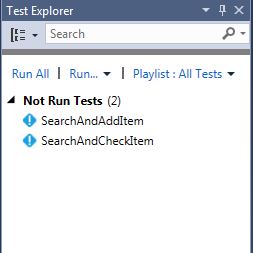
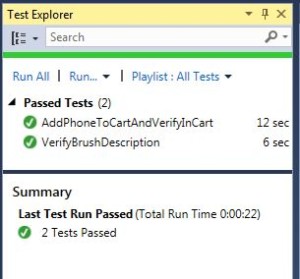
Test The Code:
Open Test Explorer window and you will see as below. To test the code click on the ‘Run All’ option in the Test Explorer windows. You will see new chrome browser instance launched and loaded www.donethedeal.com website and close the browser. You can add some wait in Test method in case if you want to make sure if it goes to TestMethod or not.
You can run that test in debug mode and you can put a breakpoint into your code and step through that. To run in debug mode you need to run test via Test Toolbar. Select the test in Test Explorer and Go to Test->Debug->Selected Test.
Test Code Implementation
Now we will work on the implementation of test Steps.
// Click on nexus phone link that will take you to the description page
To perform above step. You just need to click on the application that will eventually take you the details page of the Nexus phone. Since we have only two products on the Test application then it is easy to write.
[sourcecode language=”csharp”]
driver.FindElement(By.PartialLinkText("Nexus")).Click();
var summary = driver.FindElement(By.CssSelector("#product-18 > div.row > div.col-md-7 > div > div.product_meta > span > span")).Text;
[/sourcecode]
You just need to click on the application that will eventually take you the details page of the Nexus phone. Since we have only two products on the Test application then it is quick to execute. If you run that you will notice that product description page appeared and then closes the browser. We need to have some verification framework. For that, We can use Assert.
And code will look like this:
[sourcecode language=”csharp”]
driver.FindElement(By.PartialLinkText("Nexus")).Click();
var sku = driver.FindElement(By.CssSelector("#product-18 > div.row > div.col-md-7 > div > div.product_meta > span > span")).Text;
Assert.AreEqual("10001", sku);
[/sourcecode]
Assert call with is to verify items.
Later you can add following code to verify cart.
[sourcecode language=”csharp”]
[TestMethod]
public void AddPhoneToCartAndVerifyInCart()
{
driver.FindElement(By.PartialLinkText("Nexus")).Click();
var sku = driver.FindElement(By.CssSelector("#product-18 > div.row > div.col-md-7 > div > div.product_meta > span > span")).Text;
Assert.AreEqual("10001", sku);
driver.FindElement(By.CssSelector("#product-18 > div.row > div.col-md-7 > div > form > button")).Click();
//Verify if item added to cart.
driver.FindElement(By.XPath("//*[@id=’content’]/div/div/div[2][contains(text(), ‘was successfully added to your cart’)]"));
//Clikc Go to cart\
driver.FindElement(By.CssSelector("#content > div > div > div.woocommerce-message > a")).Click();
var dd = driver.FindElement(By.XPath("//*[@id=’content’]/div/div/div/form/table/tbody/tr[1]/td[1]")).Text;
//Verify If one phone given the cart.
Assert.AreEqual("×", driver.FindElement(By.XPath("//*[@id=’content’]/div/div/div/form/table/tbody/tr[1]/td[1]")).Text);
Assert.AreEqual("1", driver.FindElement(By.XPath("//*[@id=’content’]/div/div/div/form/table/tbody/tr[1]/td[5]")).Text);
Assert.AreEqual("Proceed to Checkout", driver.FindElement(By.CssSelector("#content > div > div > div > form > table > tbody > tr:nth-child(2) > td > a")).Text);
}
[/sourcecode]
Execute the test either in run mode and or debug mode and see the result. It will be pass. If its failing then try to give some pause wherever required
Note: Avoid using any hard wait in the script though.
In similar way you need to write another Test case where you just click on brush and verify the description and close the browser. And overall code will look like:
[sourcecode language=”csharp”]
using System;
using Microsoft.VisualStudio.TestTools.UnitTesting;
using OpenQA.Selenium;
using OpenQA.Selenium.Chrome;
using OpenQA.Selenium.Support;
using ExcelReader;
namespace AddItemToShoppingCart
{
[TestClass]
public class VerifyItems
{
IWebDriver driver;
string url = "http://learnseleniumtesting.com/demo/";
[TestInitialize]
public void TestSetup()
{
driver = new ChromeDriver();
driver.Navigate().GoToUrl(url);
}
[TestCleanup]
public void Cleanup()
{
driver.Quit();
}
[TestMethod]
public void AddPhoneToCartAndVerifyInCart()
{
driver.FindElement(By.PartialLinkText("Nexus")).Click();
var sku = driver.FindElement(By.CssSelector("#product-18 > div.row > div.col-md-7 > div > div.product_meta > span > span")).Text;
Assert.AreEqual("10001", sku);
driver.FindElement(By.CssSelector("#product-18 > div.row > div.col-md-7 > div > form > button")).Click();
//Verify if item added to cart.
driver.FindElement(By.XPath("//*[@id=’content’]/div/div/div[2][contains(text(), ‘was successfully added to your cart’)]"));
//Clikc Go to cart\
driver.FindElement(By.CssSelector("#content > div > div > div.woocommerce-message > a")).Click();
var dd = driver.FindElement(By.XPath("//*[@id=’content’]/div/div/div/form/table/tbody/tr[1]/td[1]")).Text;
//Verify If one phone given the cart.
Assert.AreEqual("×", driver.FindElement(By.XPath("//*[@id=’content’]/div/div/div/form/table/tbody/tr[1]/td[1]")).Text);
Assert.AreEqual("1", driver.FindElement(By.XPath("//*[@id=’content’]/div/div/div/form/table/tbody/tr[1]/td[5]")).Text);
Assert.AreEqual("Proceed to Checkout", driver.FindElement(By.CssSelector("#content > div > div > div > form > table > tbody > tr:nth-child(2) > td > a")).Text);
}
[TestMethod]
public void VerifyBrushDescription()
{
driver.FindElement(By.PartialLinkText("Brush")).Click();
var description = driver.FindElement(By.CssSelector("#product-28 > div.row > div.col-md-7 > div > h1")).Text;
Assert.AreEqual("Makeup Brush", description);
}
}
}
[/sourcecode]
I am using C# and Visual Studio 2013 Express Edition. The code given in the video is different than the code given in this blog.
Please change the quality of video to HD so you can see the code clearly.
Hopefully, this video is helpful for the beginners who want to learn or use WebDriver with .NET framework
Please don’t forget to like/comment on video if you have any suggestion or you like this.
Sample Website: http://learnseleniumtesting.com/demo/
The Best
I recommend this video to all beginners
Hi, the link you provided for the video http://www.youtube.com/watch?v=y9iFvpK10fw is not working, is there any updated link?
Saranga,
I updated the post with newer video. Previous video was without voice but now its has been updated with voice too.
Thanks you very much for your comment. Keep watching and do not forget to write your comments.
Thanks for sharing this information.It was very nice blog to learn about Selenium.
Thanks for sharing this Information, Got to learn new things from your Blog on Selenium.
http://thecreatingexperts.com/software-testing-training-in-chennai/selenium-training-in-chennai/
Excellent video,Many Thanks!
Request you to upload more videos from which include handling drop downs, scrolling up & down,handling pop ups,would be of great help
Many Thanks Again
Thanks Kushal for your comments. I will definitely upload videos and add into all related posts.
Please keep visiting blog for new videos and post.
Hi Aditya,
This video is very helpful to all freshers.
Can you share any link to me
“How to link drop down facility and click any modules on c# with webdriver”.
Actually I am new on selenium web driver tool.
Hi Pradeep,
Thanks for generous comment.
What kind of drop down and click you are looking for? If I am getting your point then, You mean that you want to hover mouse on top menu of site and that results in submenu and then you want to click on one of the menu item? If not then please share little more info about your question so it would be easy for anyone to answer. Thanks
Hi Aditya,
I think this is a great tutorial for complete beginners like me. I am currently working my way thtough this tutorial and wondered how this below piece of code originated:
driver.FindElement(By.PartialLinkText(“Nexus”)).Click();
var summary = driver.FindElement(By.CssSelector(“#product-18 > div.row > div.col-md-7 > div > div.product_meta > span > span”)).Text;
The first line i understand; you are finding an element with “nexus” as a string in the link.
In the second line, I do not know what you are doing after By.CssSelector(“product-18…. etc, etc, etc.. This is the point at which I no longer understand what the code is doing. Please could you explain in further detail the second line of code? Thank you very much!
Hello again Aditya..
I’ve just seen the video (which wasn’t showing before) and now I understand where the CssSelector code comes from.
Thanks,
Samantha 🙂
Samantha, Glad that video helped!
Hi Aditya,
So, as I mentioned earlier, I am a complete newbie when it comes to Selenium. So far I have learnt how to implement the WebDriver Interface and create and execute a simple test using elements and CSS Paths (as per your tutorial).. But, what’s next for me? What do you recommend I learn next? What are the most important features/topics of Selenium webDriver that I need to know?
Thanks,
Samantha
Hi Samantha,
Thanks for writing. Personally, I would suggest to learn about page factory concept once you get used to the tool. This is really very interesting topic. https://code.google.com/p/selenium/wiki/PageFactory
I do not have any article on that but I can write something if you are not very much clear based on the above link. While ago, I wrote a basic C# project based on PageObject.Refer:
https://github.com/LearnSeleniumTesting/PageObjectandPageFactoryDesignPatternDemo
This website has changed a lot after the code I wrote. But you will get fare idea about page factory based on code written. Let me know if you have any question on that. You can post here or in forum section. I will try to respond asap.
Hi Aditya,
I am a complete newbie when it comes to Selenium.
So far I have learned through your video how to implement the WebDriver Interface and create and execute a simple test using elements and CSS Paths (as per your tutorial)..You are awesome sir Yay 🙂
You made it so easy to follow and learn please I want to be ur student by all means sir please guide and teach me on the next steps
as far selenium automation is concern,I am so glad I found your site sir.
God less you.
Thanks,
Hi Olga,
Thanks for the complement and sorry for replying late. I am glad that blog helped you to understand selenium with C#. Right now I do not have a training series but now I think I should work on this :). For now you can refer framework which I wrote while ago https://github.com/LearnSeleniumTesting/WDTF Try to explore folders to understand. In very short, I tried to create wrapper around all keyword and make them easy to use from on library and use that dll in project to create test cases. Refer https://github.com/LearnSeleniumTesting/WDTF/blob/master/GlobalLib/WDNav.cs to understand the wrapper, I am sure you will understand and figure out. Now I am seeing lot of improvement area to improve the wrapper. If you like to help to improve this code then create a pull request and I can merge.
Thanks again!
Aditya
Thanks Aditya -:)
Hi,
Really thanks to you for this great video ,its helps me a lot to start with Selenium web drivers I am a binger now I understand how to code with it.
Thanks once again and keep it up to help others.
Thank you Bibek for your kind words. Let me know if you have any question or need any information related to your selenium tests or automation in general.
Nice video to learn basic selenium.
Thank you Girish.
This is really awesome video for beginners.
I got the error “A project with an Output Type of Class Library cannot be started directly” when try to run the project. Could you please help me?
Hi Loc,
Look like you are trying to run class project directly. you need to download and add dll given on the blog to your actual test and use it or create new class Project, add the given code there and build the dll file and later use this dll file in your actual test.
Let me know if that helpful.
Really Nice stuff. For more Selenium videos visit :
it doesn’t even run.. wtf guys ?!
Sorry to hear Paul,
What issue are you seeing? Please share so I can check if I missed anything.
Hi, do you allow guest posting on learnseleniumtesting.com?Please let me know on my email.
Yes. We do. Please email your posting in PDF to [email protected]
Good Day Aditya
Thank you very much! Video is great and I practiced it and all is good.
One thing it would be helpful to know:
driver.FindElement(By.Id(“pageheader”)).
What is the “pageheader” – say i am trying to do the same on another website.
I guess what i am asking is how to ID this frame or form on the page page where it is located.
Thank you very much!
Andrew
Sorry for late response Andrew but pageheader is an id of the element.